
Kelvinator Inverter AC, Error
Mbsmpro.com, Kelvinator Inverter AC, Error Codes, E1, E2, E3, E4, E0, E6, F1, F2, F3, F4, F5, F6, F7, F8, F9, E8, Troubleshooting, Fault Diagnosis, Communication Error, Compressor Protection
Understanding Kelvinator Inverter AC Error Codes – Complete Diagnostic Guide
When your Kelvinator inverter split air conditioner displays an error code on the indoor unit, it is sending a critical diagnostic message. These codes—whether they appear as E‑series (E0, E1, E2, E3, E4, E6, E8) or F‑series (F1, F2, F3, F4, F5, F6, F7, F8, F9)—indicate specific faults in the refrigeration, electrical, or control systems.
Understanding what each code means empowers you to take quick action, communicate accurately with service technicians, and sometimes resolve issues without costly repairs. This guide breaks down every major error code found in Kelvinator inverter systems, the underlying causes, and professional troubleshooting steps.
Why Error Codes Matter in Inverter AC Design
Modern Kelvinator inverter air conditioners use sophisticated microprocessor controls and wireless communication between indoor and outdoor units. Unlike older fixed‑speed units, inverter models continuously adjust compressor speed to match cooling demand, saving energy but adding complexity.
When a sensor fails, a connection breaks, or the IPM module (Intelligent Power Module) overheats, the system detects the abnormality and triggers a protective shutdown with an error code display. This is not a failure of the system—it is the system protecting itself from damage.
Field technicians and homeowners who recognize these codes can:
- Perform targeted checks (e.g., verify wire connections for E6 codes)
- Know whether to clean filters, reset the unit, or call for service
- Provide accurate fault information to repair professionals
- Prevent cascading damage from overlooked issues
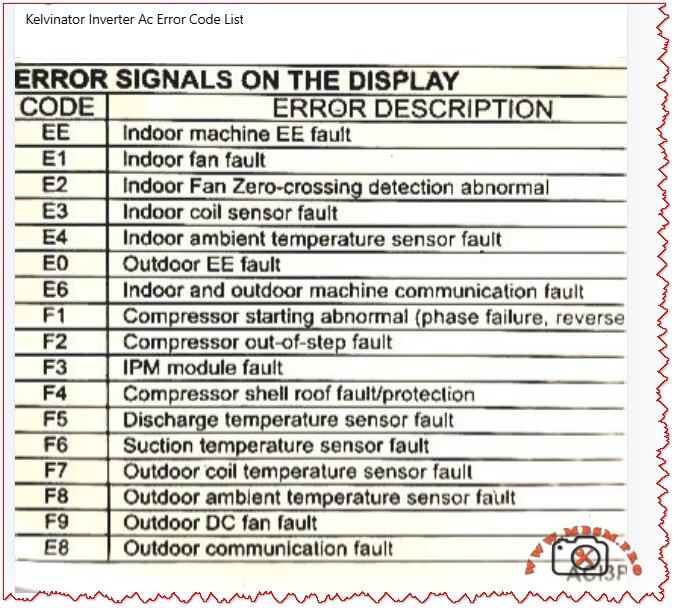
E‑Series Error Codes: Indoor and System‑Level Faults
The E codes generally cover sensor malfunctions, communication breakdowns, and refrigeration protection triggers. Below is the complete breakdown.
EE – EEPROM Loading Malfunction
| Aspect | Details |
|---|---|
| What it means | The internal memory chip (EEPROM) that stores configuration data cannot be read or written properly. |
| Common causes | Power surge damage, faulty main control PCB, corrupted memory data after abnormal shutdown. |
| What to do | Power off for 15–30 minutes to reset memory. If it persists, contact authorized service; PCB replacement may be needed. |
| Field note | This code suggests electrical stress has occurred; inspect the power supply and consider surge protection. |
E1 – Indoor Fan Fault
| Aspect | Details |
|---|---|
| What it means | The indoor unit blower fan is not running, running intermittently, or has seized. |
| Common causes | Motor winding open circuit, capacitor failure, ice on coil blocking fan rotation, dust accumulation, loose wiring. |
| What to do | 1. Check if the filter is clogged (clean if needed). 2. Listen for any grinding noise (seized bearing). 3. Visually inspect the fan blade for ice or debris. 4. If still blocked, turn off and call service. |
| Field note | E1 is among the most frequent codes in tropical climates due to rapid ice formation during high humidity. |
E2 – Indoor Fan Zero‑Crossing Detection Abnormal
| Aspect | Details |
|---|---|
| What it means | The control board cannot properly detect the fan speed signal (electrical switching transitions). |
| Common causes | Loose wire at the fan motor, faulty fan capacitor, wiring harness disconnection, moisture in the motor connector. |
| What to do | 1. Power off the unit. 2. Check all wire connections at the indoor fan motor. 3. Dry any wet connectors and ensure firm seating. 4. Power on and observe. 5. If code returns, the fan motor or capacitor requires replacement. |
| Field note | Often occurs after extended high‑humidity operation or recent water leak in the unit. |
E3 – Indoor Coil Sensor Fault
| Aspect | Details |
|---|---|
| What it means | The temperature sensor on the indoor heat exchanger (evaporator coil) has failed or become disconnected. |
| Common causes | Sensor wire loose at connector, sensor element corroded by refrigerant or moisture, PCB connector pin bent or corroded. |
| What to do | 1. Power off. 2. Locate the thin wire sensor in the indoor coil area (usually copper or stainless steel bulb). 3. Check the connector at the PCB. 4. Ensure the connector is fully seated and dry. 5. If clean and seated, the sensor itself has failed and must be replaced. |
| Field note | Refrigerant residues or corrosion inside the unit can damage sensors over time; consider coil cleaning as preventive maintenance. |
E4 – Indoor Ambient Temperature Sensor Fault
| Aspect | Details |
|---|---|
| What it means | The room air temperature sensor (thermistor) is open circuit, short circuit, or out of range. |
| Common causes | Sensor disconnected or cracked, thermistor element drifted or failed, wiring pinched behind the circuit board. |
| What to do | 1. Power off. 2. Locate the sensor (usually a small black bulb near the air inlet). 3. Visually inspect for cracks or loose wires. 4. Gently wiggle the connector to check for poor contact. 5. If the sensor is physically damaged, replacement is required. |
| Field note | In dusty environments, sensor connectors can corrode; applying a small amount of dielectric grease (e.g., for automotive use) can reduce future failures. |
E0 – Outdoor Unit EE Fault
| Aspect | Details |
|---|---|
| What it means | The outdoor unit’s EEPROM or memory is corrupted or inaccessible. |
| Common causes | Power surge at outdoor unit, faulty outdoor PCB, loose connection to the outdoor unit. |
| What to do | 1. Switch off the system for 20–30 minutes. 2. Check the outdoor unit power supply and connections. 3. Restart the system. 4. If code repeats, the outdoor control board likely has a fault. Contact authorized service. |
| Field note | Ensure outdoor unit is protected from direct water spray (e.g., from a hose) and covered during monsoon season to avoid electrical damage. |
E6 – Indoor and Outdoor Unit Communication Fault
| Aspect | Details |
|---|---|
| What it means | The wireless or wired communication link between the indoor and outdoor units has been interrupted or lost. |
| Common causes | Loose wire at connector, wrong wiring polarity (ground and signal reversed), interference from nearby devices, faulty communication PCB on either unit. |
| What to do | 1. Power off completely. 2. Check the wiring harness between indoor and outdoor units at both ends. 3. Verify connections match the wiring diagram (usually in the manual). 4. If wires are correct and tight, turn on again. 5. If still E6, check for physical damage to the wiring (crushed by furniture, cut, or wet). 6. If wiring is intact, the communication module (PCB) has failed. |
| Field note | E6 is more common in older Kelvinator units with wireless remote communication; ensure the remote has fresh batteries and is not obstructed. |
E8 – Outdoor Unit Communication Fault
| Aspect | Details |
|---|---|
| What it means | Communication error originates at the outdoor unit; the display board and main control panel cannot exchange data. |
| Common causes | Loose harness inside the outdoor enclosure, water ingress into the control panel, damaged PCB, power supply issues to the outdoor control board. |
| What to do | 1. Power off. 2. Inspect the outdoor unit for water damage or corrosion around connector pins. 3. Check cable connections inside the outdoor unit (may require opening the cover—use caution with live electrical components). 4. If water is present, dry the connectors and allow the unit to dry for 24–48 hours before restarting. 5. If dry and connections are tight, contact service for PCB replacement. |
| Field note | Heavy rain, improper drainage near the outdoor unit, or air conditioning near the ocean (salt spray) can accelerate corrosion; inspect quarterly in harsh environments. |
F‑Series Error Codes: Compressor, Sensor, and Electrical Protection
The F codes indicate failures in the outdoor unit, particularly sensor, compressor, and power electronics faults. These are more critical and often require professional intervention.
F1 – Compressor Starting Abnormal (Phase Failure, Reverse Phase)
| Aspect | Details |
|---|---|
| What it means | The compressor will not start due to missing phase, reversed phase sequence, or low voltage at the compressor terminals. |
| Common causes | Blown circuit breaker, loose wiring at the outdoor unit, reversed wiring polarity (especially in three‑phase systems), voltage too low (<200 V on 220 V system), defective IPM module. |
| What to do | 1. Check the main circuit breaker for your air conditioner (in the electrical panel). If tripped, reset it and observe if it trips immediately (indicating a fault). 2. Measure the voltage at the outdoor unit terminals using a multimeter (should match the unit rating, e.g., 220–240 V for single‑phase). 3. If voltage is very low, there may be a cable break or loose connection. 4. If voltage is normal and the breaker holds, check wiring polarity at the outdoor connector. 5. If all electrical checks pass, the IPM module inside the outdoor unit has likely failed and requires professional replacement. |
| Field note | F1 is often preceded by a visible electrical event (blown breaker, lights dimming). Always verify utility supply is stable before assuming the AC is faulty. |
F2 – Compressor Out‑of‑Step Fault
| Aspect | Details |
|---|---|
| What it means | The compressor is not synchronizing with the control signal; it is running at the wrong speed or not running smoothly. |
| Common causes | Low refrigerant (gas leak), high suction pressure, mechanical jam in compressor, faulty inverter drive circuit, loose wire to compressor. |
| What to do | 1. This code typically indicates either a refrigeration problem or a drive circuit issue. 2. Listen to the outdoor unit—does the compressor sound normal or does it stall/strain? 3. Feel (not touch directly) the outdoor copper lines for temperature difference; cold suction line and warm discharge line indicate gas is circulating. 4. If both lines are equally warm or cold, refrigerant may be depleted. 5. Do not attempt to add refrigerant without proper training. Contact a licensed technician. 6. If refrigerant lines feel normal, the inverter drive board or wiring is suspect. |
| Field note | F2 combined with poor cooling suggests a refrigerant leak; sealing the leak and recharging is necessary. Schedule professional service immediately to avoid compressor burnout. |
F3 – IPM Module Fault
| Aspect | Details |
|---|---|
| What it means | The Intelligent Power Module (IPM)—the electronic component that controls and protects the inverter compressor—has detected an internal fault or is overtemperature. |
| Common causes | IPM overheating due to high ambient or dirty condenser, internal IPM component failure (IGBT transistor or diode), loose thermal contact between IPM and heatsink, excessive current draw from compressor. |
| What to do | 1. Ensure the outdoor unit condenser is not blocked by leaves, dust, or debris. Clean the condenser fins with a soft brush or compressed air. 2. Check that the outdoor fan is spinning freely when the unit runs. 3. Touch (carefully) the heatsink near the outdoor unit’s electrical panel—it should be warm but not too hot to touch for more than a few seconds (roughly <50 °C / 122 °F is acceptable during high load). 4. If the heatsink is extremely hot or the fan is not running, the IPM is likely overheating. 5. Turn off the unit and allow it to cool for 30 minutes, then restart. 6. If F3 recurs frequently during hot weather, the IPM or the cooling solution (fan, airflow) is failing. Professional service is needed. |
| Field note | IPM failures are a leading cause of air conditioner breakdown in Kelvinator units operating in high ambient (>40 °C / 104 °F). Ensuring adequate ventilation around the outdoor unit and cleaning the condenser monthly extends IPM life. |
F4 – Compressor Shell Roof Fault / Protection
| Aspect | Details |
|---|---|
| What it means | The compressor discharge temperature (measured inside the compressor shell) has exceeded safe limits. |
| Common causes | Low refrigerant causing the compressor to run hot, high outdoor ambient temperature, compressor motor load too high, faulty discharge temperature sensor. |
| What to do | 1. Allow the unit to run in cooling mode with normal settings. 2. After 10 minutes of operation, touch the outdoor copper discharge line (the thin line coming from the compressor toward the condenser)—it should be hot (~60–70 °C / 140–158 °F) but not scalding. 3. Feel the suction line (larger line returning to the compressor)—it should be cool (~0–10 °C / 32–50 °F) and may have frost. 4. If suction is warm and discharge is only lukewarm, refrigerant is low. 5. If temperatures feel extreme, reduce the load (close extra rooms, reduce set temperature by just 1–2 °C) and recheck. 6. Persistent F4 with normal refrigerant suggests either a sensor fault or internal compressor damage. Contact service. |
| Field note | In very hot climates, F4 may occur temporarily during peak heat; if it clears after an hour of cooling and does not repeat, no action is needed. |
F5 – Discharge Temperature Sensor Fault
| Aspect | Details |
|---|---|
| What it means | The sensor measuring compressor discharge temperature is not responding correctly. |
| Common causes | Sensor wire disconnected or pinched, sensor element burnt out, PCB connector corroded or loose. |
| What to do | 1. Power off the unit. 2. Locate the discharge temperature sensor on the outdoor unit (a small bulb or wire-wound sensor). 3. Visually inspect for loose or damaged wiring. 4. Check the connector at the outdoor PCB is fully seated. 5. If connections are sound, the sensor element itself has failed. Replacement is required. |
| Field note | Discharge sensors are often damaged when the compressor runs with depleted refrigerant; always confirm refrigerant level is adequate before replacing the sensor. |
F6 – Suction Temperature Sensor Fault
| Aspect | Details |
|---|---|
| What it means | The sensor measuring refrigerant suction (inlet) temperature is faulty. |
| Common causes | Similar to F5: disconnected wire, burnt-out sensor element, corroded PCB connector. |
| What to do | 1. Power off. 2. Locate the suction temperature sensor (usually clipped to the large copper suction line entering the compressor). 3. Check for loose or torn wiring. 4. Verify the connector is dry and fully seated at the PCB. 5. If intact, the sensor requires replacement. |
| Field note | Suction sensors are robust but can corrode if refrigerant moisture is present; proper evacuation and drying during any compressor service prevents this fault. |
F7 – Outdoor Coil Temperature Sensor Fault
| Aspect | Details |
|---|---|
| What it means | The condenser (outdoor heat exchanger) temperature sensor is open circuit, short, or out of range. |
| Common causes | Wire disconnected or pinched under the condenser, sensor element failed, moisture in the connector causing corrosion. |
| What to do | 1. Power off. 2. Inspect the outdoor condenser area for loose sensor wires or connections. 3. Check the routing of the sensor lead—ensure it is not pinched between the condenser fins or trapped under a mounting bracket. 4. Dry any wet connectors. 5. Retest. 6. If the wire is intact and dry, the sensor element has failed and must be replaced. |
| Field note | High-pressure water spray during cleaning can push water into sensor connectors; use a soft brush instead of direct spray. |
F8 – Outdoor Ambient Temperature Sensor Fault
| Aspect | Details |
|---|---|
| What it means | The outdoor air temperature sensor is disconnected, damaged, or is reporting an out-of-range value. |
| Common causes | Loose wire at the outdoor wall-mounted sensor, sensor bulb cracked, PCB connector pin bent or corroded, sensor element drifted due to age. |
| What to do | 1. Power off. 2. Locate the outdoor ambient sensor (a small round or bulbous device mounted on the outdoor unit casing). 3. Check for cracks or loose wiring. 4. Ensure the connector is clean, dry, and fully seated. 5. If all connections are sound, the sensor element has failed and needs replacement. |
| Field note | Outdoor sensors are exposed to sunlight and temperature swings; replacing every 5–7 years is a reasonable preventive measure. |
F9 – Outdoor DC Fan Fault
| Aspect | Details |
|---|---|
| What it means | The outdoor condenser fan is not running, running at wrong speed, or has stalled. |
| Common causes | Fan motor capacitor failed, motor bearing seized, blade obstruction (leaves, debris, ice), loose wiring at the fan connector, voltage drop in supply. |
| What to do | 1. Power off and unplug. 2. Spin the fan blade by hand—it should rotate freely and smoothly without grinding. 3. If it binds, the bearing is seized; the motor requires replacement. 4. If it spins freely, check for blocked airflow (dust, leaves, insects). Clean the condenser and surrounding area. 5. Inspect the fan motor capacitor (if accessible) for bulging or leakage; a capacitor with dried-out ends likely has failed. 6. Power back on and listen. If the fan still does not run, check the connector at the PCB. 7. If the connector is tight and dry but the fan does not run, the motor has failed. |
| Field note | The fan capacitor is a common wear item in tropical climates; proactive replacement every 2–3 years prevents sudden failure. |
E8 (Continued) – Outdoor Communication Fault
Covered above in E-series; also applies to outdoor control issues.
Comparison: Kelvinator Error Codes vs. Other Inverter AC Brands
To help technicians working across multiple brands, the table below compares how similar faults are coded.
| Fault Description | Kelvinator | Midea / AUX | Carrier | Haier | Orient |
|---|---|---|---|---|---|
| Outdoor unit fan fault | F9 | F0 | F0 | F0 | F0 |
| IPM module overtemp/fault | F3, F7 | F7 (IPM temp) | F5 (IPM) | F1 (IPM) | F5 (IPM) |
| Compressor start abnormal | F1 | F6 (phase), F1 (IPM) | EC, F1 | F1 | F1 |
| Refrigerant leak (low pressure) | E3 | E3, E5 | E3 | E3 | E3 |
| Communication error | E6, E8 | E6 | E1 | E6 | E6 |
| Room temp sensor fault | E4 | E2 | E2 | E2 | E2 |
| Coil temp sensor fault | E3 | E1 | E4 | E1 | E1 |
| Discharge temp sensor fault | F5 | F2 | F2 | F2 | F2 |
| Fan motor fault | E1 | E0 | E0 | E0 | E0 |
Key insight: Although brand coding differs, the underlying components and fault mechanisms are nearly identical. A technician familiar with one brand can quickly learn another by cross-referencing sensor and module names.
Practical Troubleshooting Flowchart for Kelvinator Error Codes
When an error code appears, use this systematic approach:
Step 1: Identify and Record the Code
Write down the exact code (e.g., F3, E6). Check the display in different light and from different angles to confirm the character.
Step 2: Safety First
Before troubleshooting, ensure power is safely isolated. If you are unsure, do not open electrical enclosures.
Step 3: Quick Reset
Turn off the unit at the wall switch or circuit breaker. Wait 15–30 minutes, then restart. Many codes clear if they were temporary electrical glitches.
Step 4: Visual Inspection
- E1, E2, F9: Check filter and fan visually for blockage or damage.
- E3, E4, F5, F6, F7, F8: Inspect all visible sensor wires for disconnection, pinching, or damage.
- E6, E8: Check wiring between indoor and outdoor units.
- F1, F3: Check outdoor unit for debris, ensure fan moves freely, verify power supply.
Step 5: Component Testing (if equipped with a multimeter)
- For sensor faults, measure resistance of the sensor element. A typical thermistor should read a few thousand ohms; an open circuit (∞) or zero ohms indicates failure.
- For wiring faults, check continuity along the suspected wire path.
- For power faults, verify voltage at key points matches the unit specification.
Step 6: Document and Report
If the error recurs or you cannot identify the cause, note:
- Time of day and outdoor ambient temperature.
- How many minutes the unit ran before the error appeared.
- Any recent weather events, power outages, or changes to the setup.
- Any sounds or odors noticed.
Provide this information to the service technician to speed diagnosis.
Professional Advice: Maintenance to Prevent Errors
Many Kelvinator error codes can be prevented through regular maintenance:
- Filter Cleaning (Monthly)
A clogged filter reduces airflow, lowers cooling efficiency, and triggers E1 (fan fault). Clean the filter or replace it every month during cooling season. - Condenser Inspection (Quarterly)
Outdoor dust, leaves, and debris block airflow, causing F3 (IPM overtemp) and F9 (fan fault). Gently clean the outdoor unit with a soft brush or compressed air. - Wiring Inspection (Annually)
Visual inspection of all connectors and wiring harnesses (between indoor and outdoor units) can catch loose connections before they trigger E6 or E8 codes. - Sensor Bulb Checks (Annually)
Visually inspect temperature sensor bulbs for physical damage, corrosion, or frost buildup. Replace any that appear damaged. - Refrigerant Level (Every 2–3 years)
Have a licensed technician verify refrigerant charge. Low gas causes F1, F2, and F4 codes and reduces cooling. - IPM and Capacitor Condition (Every 3–5 years)
In high-temperature climates or after many operating hours, have the outdoor electrical components inspected. Proactive capacitor replacement (a wear item) prevents sudden shutdowns.
Error Code Scenarios: Real-World Examples
Scenario 1: E1 Code During Night Operation in High Humidity
What happened: Unit ran fine during the day. At night, E1 appeared and the fan stopped.
Diagnosis: High nighttime humidity combined with cold evaporator coil caused ice to form on the indoor coil fins, blocking the fan.
Solution: Run the unit in dry mode or reduce the set temperature by 2 °C. Allow ice to melt for 30 minutes. If E1 repeats nightly, ensure the drain pan is not clogged (preventing condensate drainage).
Prevention: Clean the air filter monthly; clogging accelerates ice formation.
Scenario 2: F3 Error on the First Hot Day of Summer
What happened: Unit worked fine during spring. As outdoor temperature jumped to 38 °C (100 °F), F3 (IPM overtemp) appeared after 20 minutes of cooling.
Diagnosis: IPM module is overheating. The outdoor unit’s condenser fins were heavily dust-clogged from months of standby.
Solution: Power off, clean the outdoor condenser thoroughly, ensure outdoor fan runs without obstruction. Restart in the early morning (cooler ambient). F3 should not recur.
Prevention: Clean the outdoor condenser before each cooling season.
Scenario 3: E6 Code After Electrician Service
What happened: Technician serviced the circuit breaker panel. Shortly after, E6 (communication fault) appeared.
Diagnosis: During electrical panel work, a wire was shifted or the communication cable between indoor and outdoor units was bumped loose.
Solution: Inspect the wiring harness connections at both the indoor and outdoor unit terminals. One connector was half-seated; pushing it home resolved E6.
Prevention: Always verify that service technicians reconnect all wiring exactly as found.
When to Call a Professional
Contact an authorized Kelvinator service technician immediately if:
- F1, F2, F3, F4 appear: These indicate compressor or drive system issues requiring specialized testing equipment.
- F5, F6, F7, F8: Sensor faults usually require replacement; test equipment is needed to confirm.
- E0, EE, E8 persist after a 30-minute reset: Indicates potential PCB failure.
- E6 remains after checking all visible wiring and connectors: Suggests a deeper communication problem.
- Any error code accompanied by sparks, burning smell, or water leaks: Turn off immediately and call emergency service.
Benefits of Understanding Error Codes
- Faster Resolution: You can provide exact information to technicians, reducing diagnostic time.
- Preventive Action: Recognizing early warning patterns helps avoid catastrophic failures.
- Cost Savings: Simple fixes (cleaning, resetting) sometimes clear codes without service calls.
- System Longevity: Regular maintenance triggered by code patterns extends the life of your inverter AC by years.
Focus Keyphrase (≤191 characters)
Kelvinator inverter AC error codes E1 E2 E3 E4 E6 F1 F2 F3 F4 F5 F6 F7 F8 F9 troubleshooting guide, compressor, IPM module, sensor fault diagnosis
SEO Title
Kelvinator Inverter AC Error Codes E1, E2, E3, E4, E6, F1–F9 – Complete Troubleshooting & Fault Diagnosis Guide | Mbsmpro.com
Meta Description
Comprehensive Kelvinator inverter air conditioner error code guide. Understand E‑series (E1, E2, E3, E4, E6, E8) and F‑series (F1–F9) faults, causes, and professional troubleshooting steps for compressor, sensor, and communication failures.
Slug
kelvinator-inverter-ac-error-codes-troubleshooting-guide
Tags
Kelvinator error codes, inverter AC troubleshooting, E1 E2 E3 E4 F1 F2 F3 fault code, air conditioner error diagnosis, compressor protection, IPM module fault, communication error E6, sensor failure, HVAC troubleshooting, Mbsmgroup, Mbsm.pro, mbsmpro.com, mbsm, AC maintenance, inverter compressor
Excerpt (first 55 words)
When your Kelvinator inverter split air conditioner displays an error code (E1, E2, E3, F1, F2, F3, etc.), it is signaling a specific system fault. This comprehensive guide explains every major error code—from sensor failures and communication breakdowns to compressor and power module protection triggers—and provides professional troubleshooting steps.