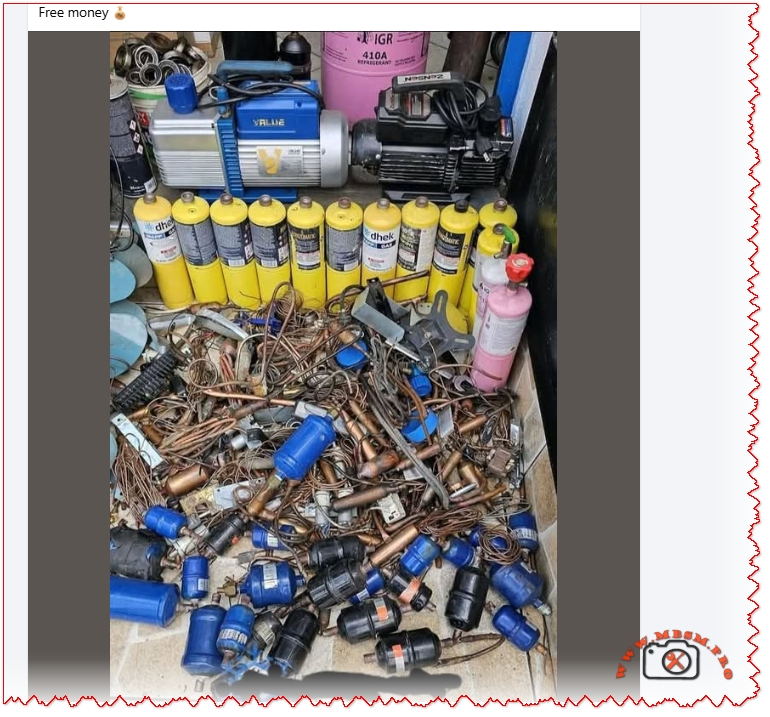
Free money Copper

Free money Copper mbsmpro


Focus Keyphrase for Google SEO:

HVAC Refrigeration Scrap Recovery Copper Filter Drier Recycling Vacuum Pump R410A Maintenance Brazing Tools

SEO Title:
Mbsmpro.com, HVAC Tools and Scrap, Filter Drier, Copper, Vacuum Pump 2 Stage, R410A Cylinder, Mapp Gas, Maintenance, Recycling, Technical Data

Meta Description:
Comprehensive guide to HVAC refrigeration component recovery. Analysis of copper filter driers, vacuum pump specifications, brazing with MAPP gas, and sustainable recycling practices for technicians.

Slug:
hvac-refrigeration-scrap-recovery-copper-filter-drier-tools

Add Tag:
Copper Recycling, Filter Drier, HVAC Tools, Vacuum Pump, R410A, Brazing, Scrap Metal, Compressor Replacement, Maintenance, Mbsmgroup, Mbsm.pro, mbsmpro.com, mbsm

Excerpt:
In the world of refrigeration maintenance, a pile of discarded components tells a story of hard work and technical precision. Every replaced filter drier represents a saved compressor, and every vacuum pump represents a system brought down to perfect microns. This guide explores the technical value behind HVAC scrap and the essential tools used in the trade.


Mbsmpro.com, HVAC Tools and Scrap, Filter Drier, Copper, Vacuum Pump 2 Stage, R410A Cylinder, Mapp Gas, Maintenance, Recycling, Technical Data

When a refrigeration technician looks at a workshop floor, they don’t just see clutter; they see the lifecycle of thermodynamic systems. The accumulation of copper filter driers, the hum of high-performance vacuum pumps, and the distinct yellow canisters of brazing gas are the hallmarks of a busy season. Whether it is replacing a burnt-out compressor or performing a system flush, managing these materials is not just about waste—it is about resource recovery and engineering integrity.

The Hidden Value in Filter Driers

The most abundant item in any refrigeration scrap pile is often the filter drier. These components are critical for the health of a cooling system, acting as the kidney of the refrigeration cycle. They trap moisture, acid, and solid debris.

When scrapping or replacing these, it is vital to understand what they are made of. Most residential and light commercial driers have a copper shell, while larger industrial ones are steel. The “free money” aspect comes from the high-grade copper used in the spun copper driers. However, for the engineer, the value is in understanding why they failed.

Technical Composition of a Filter Drier

Component Material Function Recycling Potential
Shell Spun Copper or Steel Pressure containment High (Copper is valuable)
Desiccant Molecular Sieve (Zeolite) Absorbs water/acid None (Hazardous waste)
Screen Stainless Steel / Brass Filters particulates Low
Connections Copper Brazing points High

Engineering Notice: Never reuse a filter drier. Once exposed to the atmosphere, the molecular sieve reaches saturation within minutes. A saturated drier releases moisture back into the system, creating hydrofluoric acid which destroys compressor windings.

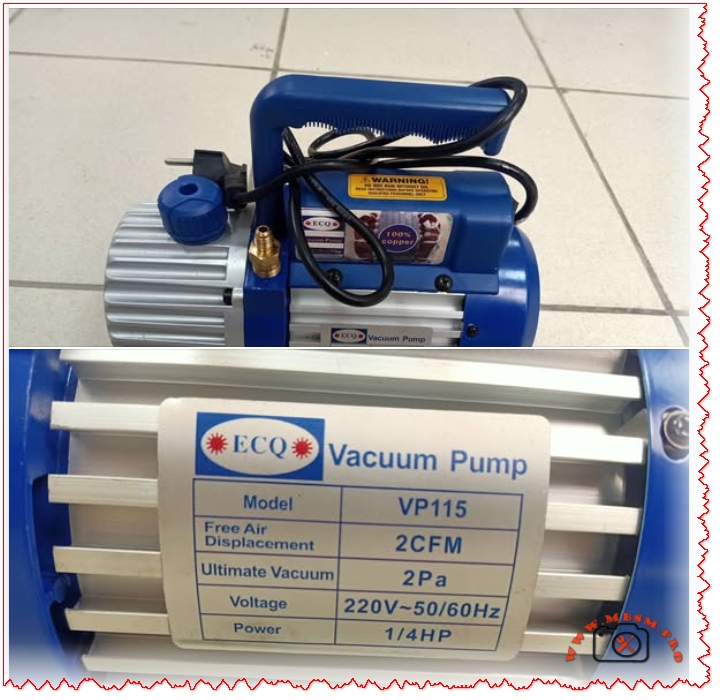
The Heart of Evacuation: Vacuum Pumps

The presence of robust vacuum pumps, such as the dual-stage rotary vane pumps often seen in professional setups (like the blue “Value” series), indicates a commitment to deep vacuums.

A vacuum pump is not just an air mover; it is a dehydration tool. By lowering the pressure inside the refrigeration circuit below 500 microns, water boils off at room temperature and is exhausted as gas.

Comparison: Single Stage vs. Dual Stage Pumps

Feature Single Stage Pump Dual Stage Pump (Recommended)
Ultimate Vacuum ~75 Microns ~15 Microns
Efficiency Lower High (Faster evacuation)
Application Automotive / Small A/C Refrigeration / Deep Freeze / R410A
Oil Sensitivity Less sensitive Requires clean oil for max performance

Maintenance Tip: The oil in a vacuum pump is hygroscopic. If the oil looks milky or cloudy, it is saturated with moisture and cannot pull a deep vacuum. Change the oil immediately after every wet system evacuation.

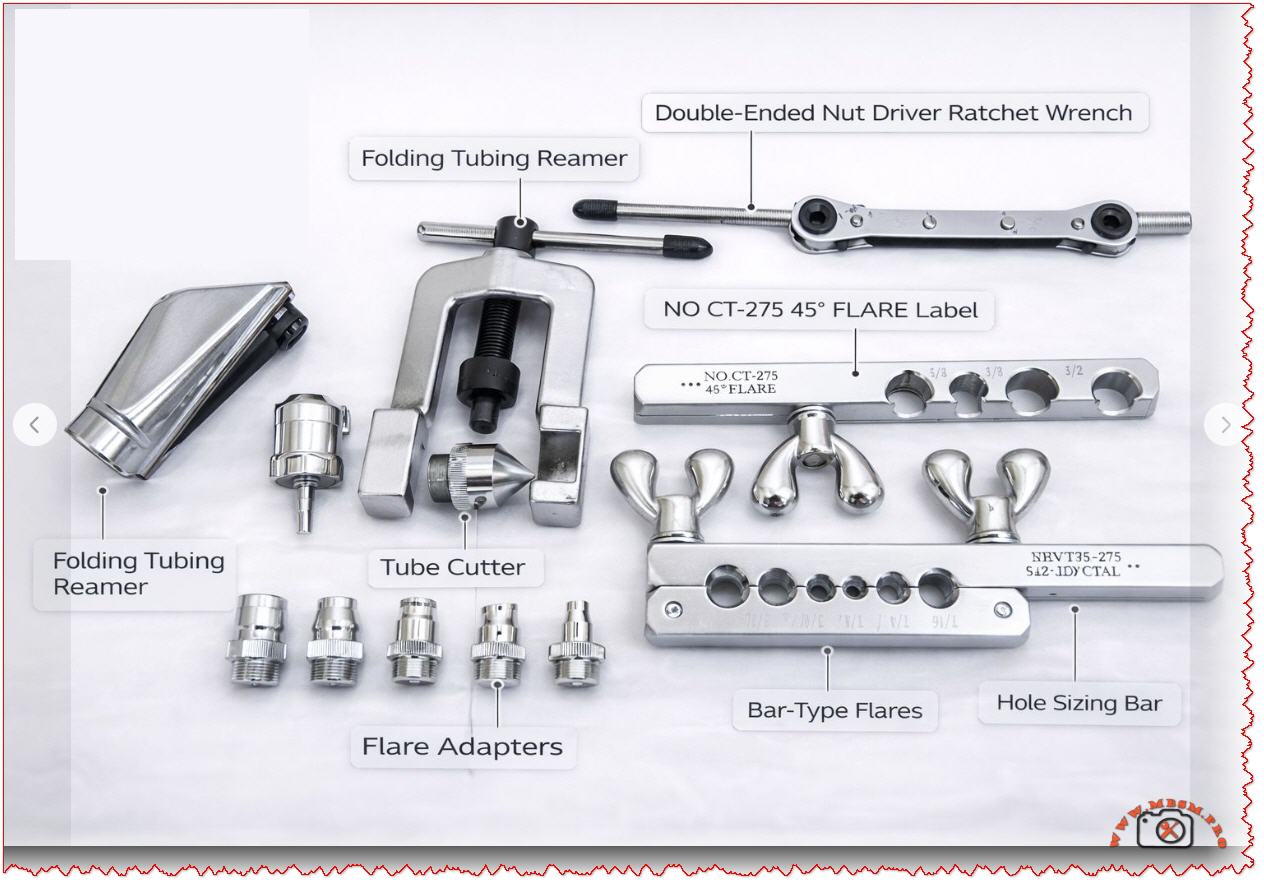
Brazing and joining: Mapp Gas vs. Propane

For joining the copper lines of filter driers or compressors, standard propane is often insufficient due to its lower burn temperature. MAPP gas (Methyl Acetylene-Propadiene Propane) or “Map/Pro” replacements are the standard for field service.

Yellow cylinder gas burns significantly hotter than blue propane cylinders, allowing the technician to melt silver solder (15% to 45% silver content) rapidly without overheating the surrounding components.

  • Propane Temperature in air: ~1,980°C (3,596°F)
  • MAPP Gas Temperature in air: ~2,925°C (5,300°F)

Safety Protocol: When brazing near a Schrader valve or a service port, always remove the valve core or use a wet rag (heat sink) to prevent the rubber seals from melting.

R410A: Handling High-Pressure Refrigerants

The pink cylinders generally indicate R410A, a hydrofluorocarbon (HFC) refrigerant. Unlike the older R22, R410A operates at pressures approximately 60% higher. This dictates that all tools—manifold gauges, hoses, and recovery tanks—must be rated for these higher pressures.

Recovery and Recycling:
Venting refrigerant is illegal and unethical. Recovered R410A must be stored in DOT-approved recovery cylinders (usually gray with a yellow shoulder) and sent to reclamation facilities. The pink disposable tanks should strictly be used for charging, not recovery, as they lack overfill protection sensors.

Maximizing Copper Recovery (The “Free Money” Aspect)

For the technician looking to liquidate scrap, segregation is key. A mixed pile of steel and copper yields the lowest return.

  1. Cut the Ends: Use a tubing cutter to remove the copper capillary tubes or connection pipes from steel-bodied driers.
  2. Separate Brass: If there are expansion valves or service valves, separate the brass from the copper.
  3. Clean Copper: Tubing should be free of insulation (Armaflex) and heavy solder joints for the best grade classification (often called #1 Copper vs. #2 Copper).

Conclusion

The messy pile of copper, worn-out tools, and empty gas canisters is the byproduct of thermal comfort. For the expert, it represents a cycle of diagnosis, repair, and renewal. Whether you are recovering resources for recycling or evacuating a system to 200 microns, precision and material knowledge are your most valuable assets.


Exclusive Comparison: Filter Drier Types

This table assists in selecting the correct drier to replace the scrap units.

Type Application Desiccant Blend Direction
Liquid Line Drier Placed after condenser 100% Molecular Sieve (or blend) Uni-directional
Suction Line Drier Placed before compressor High Activated Alumina (Acid cleanup) Bi-directional (Heat Pump) or Uni
Spun Copper Domestic fridges/freezers Molecular Sieve beads Uni-directional
Free money Copper mbsmpro


Flaring Tool Guide

Flaring Tool Guide mbsmpro

Focus Keyphrase:
flaring tool bar type multiple size openings adjustable T-handle metal tube flare HVAC plumbing connection guide

SEO Title:
Flaring Tool Guide: How to Use Bar-Type Tool with Multiple Size Openings & T-Handle | Mbsmpro

Meta Description:
Complete guide to using a bar-type flaring tool. Learn how the multiple size openings and adjustable T-handle create secure, leak-proof flares on copper tubing for HVAC and plumbing.

Slug:
bar-type-flaring-tool-multiple-size-openings-t-handle-guide

Tags:
flaring tool, bar flaring tool, HVAC tools, plumbing tools, copper tubing, tube flare, adjustable T-handle, multiple size openings, Mbsmgroup, Mbsm.prombsmpro.com, mbsm, tube fitting

Excerpt:
A bar-type flaring tool is essential for creating leak-proof connections in copper tubing. Its multiple size openings handle various tube diameters, while the adjustable T-handle provides precise control. This guide covers proper technique, common mistakes, and tool selection.


Mastering the Bar-Type Flaring Tool: Your Guide to Perfect, Leak-Proof Connections

If you’ve ever worked with refrigeration lines, hydraulic systems, or even some plumbing applications, you know that a secure connection isn’t just about tightening a nut—it’s about creating a perfect mating surface. That’s where the flaring tool becomes indispensable. Specifically, the bar-type flaring tool with multiple size openings and an adjustable T-handle is the professional’s choice for reliability and consistency. This isn’t a gadget; it’s a precision instrument for creating the 45-degree flares that form the foundation of leak-free systems.

Let’s break down why this specific design is superior and how to use it to achieve flawless results every time.

Anatomy of a Professional Flaring Tool: Why Design Matters

A generic, clamp-style flaring tool might get the job done once or twice, but for consistent, reliable results under varying conditions, the bar-type design is king. Here’s what each feature delivers:

Feature Function & Engineering Benefit
Multiple Size Openings A solid steel bar with a series of precision-drilled holes (e.g., for 1/4″, 3/8″, 1/2″, 5/8″ OD tubing). This ensures the tube is clamped squarely and concentrically, which is critical for a uniform flare.
Adjustable T-Handle A threaded screw with a T-handle that drives the flaring cone (or “pilot”). The “adjustable” aspect allows you to control the feed rate and pressure precisely, preventing over-flaring or under-flaring.
Flaring Cone (Pilot) This is the hardened, 45-degree cone that is driven into the tube end. It is typically separate from the handle and matches the specific flare angle (45° for SAE/JIC fittings common in HVAC).
Solid Steel Bar Construction Provides massive rigidity compared to yoke-style tools. This prevents flex during the flaring process, which can lead to off-center or wrinkled flares.

Step-by-Step: The Correct Flaring Technique

Using this tool correctly is a methodical process. Rushing leads to leaks and wasted materials.

  1. Cut & Prep: Cut the copper tube perfectly square using a tube cutter. Then, remove all internal and external burrs using a deburring tool or file. An internal burr is a guaranteed flow restriction.
  2. Select & Insert: Choose the correct hole in the bar that matches your tube’s outer diameter (OD). Slide the bar’s clamping mechanism over the tube and tighten it snugly. The tube should protrude slightly above the bar—usually the thickness of the flare nut.
  3. Lubricate & Position: Apply a tiny drop of refrigeration oil or light lubricant to the 45-degree flaring cone. This reduces friction and creates a smoother finish. Place the cone into the end of the tube.
  4. The Flaring Process: Thread the adjustable T-handle into the bar until it contacts the cone. Then, using steady, even pressure, turn the handle to drive the cone into the tube. Go slowly, especially on the final turns. You will feel a distinct increase in resistance when the flare is fully formed.
  5. Inspect: Unscrew the handle, remove the bar clamp, and inspect your work. A perfect flare will be concentric, smooth, and have a matte-silver appearance with no cracks, wrinkles, or tool marks.

Bar-Type vs. Yoke/Clamp-Type: A Critical Comparison

To understand the value, let’s compare it to the more common (and cheaper) alternative.

Aspect Bar-Type Flaring Tool Standard Yoke/Clamp-Type Tool
Stability & Precision Excellent. Solid bar prevents flex, ensuring a concentric flare. Poor. The clamp can twist or flex, leading to off-center, “cocked” flares.
Consistency High. Repeatable results due to rigid design and precise holes. Low. Results vary based on user grip and tool wear.
Durability Very High. Solid steel construction lasts for decades. Moderate. Cast components and pivots can wear or break.
Best For Professional use, critical applications (refrigeration, fuel gas, hydraulic). Occasional DIY use for non-critical plumbing (like water softener lines).
Cost Higher initial investment. Lower initial cost.

The Verdict: For any application where a leak means lost refrigerant, safety hazard, or system failure, the bar-type tool is the only responsible choice. The initial cost is offset by the elimination of costly callbacks and material waste from bad flares.

Professional Benefits, Advice, and Common Pitfalls

Benefits of Mastering This Tool:

  • Eliminate Callbacks: A perfect flare is a permanent, leak-free connection. This builds customer trust and saves money.
  • Faster Work: With practice, making a perfect flare becomes a quick, one-step process, speeding up installation.
  • Material Savings: You’ll stop ruining expensive tubing sections with flawed flares that must be cut off and re-done.

Critical Professional Notice & Warnings:

  • DO NOT Skip Deburring: This is the #1 mistake. The internal burr will cause turbulence, trap debris, and ultimately lead to compressor or valve failure.
  • Use the Right Lubricant: A drop of clean refrigerant oil is ideal. Do not use grease, which can contaminate a system.
  • Avoid Over-Flaring: When the T-handle gets very hard to turn, stop. Forcing it further can thin and crack the copper, creating a weak point.
  • Match the Flare to the Nut: Always test-fit the flare nut before making the flare to ensure the tube is protruding the correct amount. The finished flare should sit snugly inside the nut.

Final Recommendation: View a high-quality bar-type flaring tool not as an expense, but as an investment in your craftsmanship. It is a fundamental tool that pays for itself by ensuring the integrity of the most critical junctions in any system you build. Pair it with a good tube cutter and reamer, and you have the holy trinity for perfect tubing work.


Exclusive Image Suggestions (Safe & Relevant Links):

  • Flare Cross-Section Diagram: Search for “SAE 45 degree flare cross section diagram” on engineering or automotive hydraulic sites like Parker.com or Swagelok.com.
  • Sequence of Flare Formation: Look for “copper tube flaring sequence photos” on professional tool manufacturer sites like RIDGID.com or ImperialTools.com.
  • Bad vs. Good Flare Visual Guide: Search for “flaring defects comparison chart” on HVAC training portals like HVAC School or ESCO Institute.

PDF/Catalog Resources (Verified Sources):

  • RIDGID Tool Instruction Manual: Visit the RIDGID Tools support page and search for your specific flaring tool model (e.g., “No. 454-R”) to download the official, detailed instruction and safety PDF.
  • ESCO Institute “Refrigeration Piping” Manual: Search for “ESCO pipe and tube bending flaring pdf” for comprehensive professional training material on proper techniques.
  • SAE International Standard J533: For technical specifications, searching “SAE J533 flare fittings standard” will lead to the definitive documents governing flare design and dimensions.
Flaring Tool Guide mbsmpro


NOCT-27545 & NRVT35-275 Tool Guide

NOCT-27545 & NRVT35-275 Tool Guide mbsmpro

Focus Keyphrase:
NOCT-27545 double-ended nut driver ratchet wrench folding tubing reamer bar-type flare tool HVAC refrigeration tool kit

SEO Title:
NOCT-27545 & NRVT35-275 Tool Guide: Ratchet Wrench, Flaring Tool, Tube Reamer Uses | Mbsmpro

Meta Description:
Professional review of the NOCT-27545 ratchet wrench & NRVT35-275 flaring tool kit. Learn how to use folding tubing reamers, bar-type flare tools, and hole sizing bars for HVAC work.

Slug:
noct-27545-nrvt35-275-hvac-tool-ratchet-flare-reamer-guide

Tags:
NOCT-27545, NRVT35-275, HVAC tools, refrigeration tools, ratchet wrench, flaring tool, tubing reamer, bar-type flare, tube cutter, hole sizing bar, Mbsmgroup, Mbsm.pro, mbsmpro.com, mbsm, technician tools

Excerpt:
The NOCT-27545 ratchet wrench and NRVT35-275 flaring tool represent specialized HVAC instrumentation. This guide explains their functions, from creating perfect 45° flares to reaming tubing and driving fasteners in tight spaces, ensuring leak-free, professional installations.


NOCT-27545 & NRVT35-275 Tool Guide mbsmpro

HVAC Tool Mastery: Decoding the NOCT-27545 Ratchet Wrench and NRVT35-275 Flaring Kit

Every seasoned HVAC and refrigeration technician knows that the difference between a leak-prone, amateur installation and a flawless, professional one often comes down to the specialized tools in their bag. While flashy power tools get attention, it’s the precision instruments—like those in a comprehensive flaring and driving kit—that ensure longevity and reliability. Today, we’re breaking down a set of tools centered around two key items: the NOCT-27545 double-ended nut driver ratchet wrench and the NRVT35-275 bar-type flaring tool kit.

These aren’t generic hardware store finds; they’re purpose-built for the specific, demanding tasks of refrigeration and gas line work.

Core Tool Analysis: Function and Specification Breakdown

Let’s dissect the primary tools indicated, translating model numbers into practical understanding.

1. The NOCT-27545: The Double-Ended Ratchet Wrench

This tool solves a common field problem: accessing fasteners in confined spaces behind linesets or inside tight equipment compartments.

Feature Specification / Benefit
Design Double-ended, reversible ratchet mechanism.
Drive Sizes Typically features two most-used sizes (e.g., 1/4″ and 5/16″ hex).
Primary Use Installing service valves, panel screws, solenoid valves, and other fittings where a full swing of a standard driver is impossible.
Advantage over Standard Driver The ratcheting action allows you to tighten or loosen nuts without removing the tool, saving immense time and frustration in tight quarters.

Comparison to Standard Tools:
A standard nut driver requires ~30 degrees of clearance for repositioning. In a tight spot, you might get one partial turn before having to remove and reposition it. The NOCT-27545 ratchet allows for full, continuous torque application with as little as a 5-degree swing, making it indispensable for condenser or evaporator service.

2. The NRVT35-275: Bar-Type Flaring Tool Kit

This is the heart of leak-free connection work for soft copper tubing (Type L, ACR). The “45” in related labels signifies the 45-degree flare standard for SAE/JIC fittings, ubiquitous in HVACR.

Component (from image) Critical Function
Bar-Type Flaring Tool (Main Body) Holds the tubing secure in precise, sized holes for a consistent flare. Superior to cheaper clamp-style tools for repeatability.
Flare Adapters (45° Cone) The forming tool that is pressed/driven into the clamped tube end to create the actual 45-degree flare shape.
Hole Sizing Bar A reference tool with graduated holes to quickly verify the outer diameter of tubing, ensuring you use the correct clamp hole.
Folding Tubing Reamer Used after cutting tubing with a tube cutter to remove the internal burr. This is non-negotiable. A left-in burr creates turbulence, restricts flow, and can trap debris.

The Critical Path to a Perfect Flare: A Step-by-Step Process

Using these tools correctly is a systematic process. Here’s how they work together:

  1. Cut: Use a sharp tube cutter (like the S42-LDYCTAL implied) for a square, clean cut. Never use a hacksaw for this step.
  2. Ream: Immediately deploy the folding tubing reamer. Insert it into the tube end and rotate to cleanly remove the internal burr. Deburr the outside edge lightly.
  3. Size: Double-check your tube’s OD using the hole sizing bar. Match it exactly to the corresponding hole on the flaring bar.
  4. Clamp: Insert the tube into the correct hole on the bar-type flaring tool, leaving the appropriate amount of tube protruding (typically the height of the flare nut).
  5. Flare: Apply a drop of refrigerant oil to the flare adapter’s 45-degree cone. Screw the adapter into the bar and drive it down smoothly until it forms a complete flare. Do not over-tighten.
  6. Inspect: A perfect flare will be concentric, smooth, and have a uniform matte finish. No cracks, wrinkles, or tool marks should be present.

Benefits, Professional Advice, and Common Pitfalls

Benefits of Using This Specialized Kit:

  • Leak Prevention: A properly made flare is the first and most critical line of defense against refrigerant leaks.
  • Efficiency: The ratchet wrench and integrated tools speed up installation and service work dramatically.
  • Professional Results: Consistency is key. These tools provide repeatable, manufacturer-spec results every time.

Professional Notice & Critical Warnings:

  • Material Matters: These tools are designed for soft copper tubing. Do not attempt to flare hard-drawn copper or other metals without specific, rated tools.
  • The Reamer is Not Optional: Skipping the reaming step is the #1 cause of contamination-related failures and flow restriction. The small burr can break off and travel into a metering device.
  • Flare Inspection: Always inspect the flare visually and with a gauge if possible before assembly. A flawed flare must be cut off and re-done.
  • Torque Specs: When connecting the flare nut, use a torque wrench according to the fitting manufacturer’s specifications. Over-tightening can shear the flare, and under-tightening will guarantee a leak.

Value Comparison to Universal Kits:
While all-in-one “HVAC tool kits” are available, they often compromise on the quality of these critical forming tools. A dedicated, professional-grade bar-type flaring kit (like the NRVT series) and a precision ratchet driver (like the NOCT) will outperform universal kits in durability, result quality, and ease of use on the job daily. Investing in these separates often costs less in the long run than replacing a failed multi-tool.

Final Recommendation: For any technician serious about refrigeration or fuel gas line work, a high-quality bar flaring tool and a reliable double-ended ratchet are not just purchases; they are foundational investments in your craft and reputation. Master these tools, and you eliminate one of the most common failure points in any system you install.


Exclusive Image Suggestions (Safe & Relevant Links):

  • Sequence of a Perfect Flare: Search for “step by step bar flaring tool process” on professional tool manufacturer sites like RIDGID.com, ImperialTools.com, or YellowJacket.com.
  • Internal Burr Diagram: Look for “tube cutting internal burr diagram” on educational engineering or HVAC training sites like ESCO Institute or HVAC School.
  • Flare Inspection Gauge: Search for “SAE 45-degree flare inspection gauge” on supplier sites like Johnstone Supply or United Refrigeration.

PDF/Catalog Resources (Verified Sources):

  • RIDGID Flaring Tool Manual: Visit the RIDGID Tools website and search for “Flaring Tool Instruction Sheet” for official, detailed usage and safety PDFs.
  • ESCO Institute Refrigeration Piping Handbook: Search for “ESCO refrigerant piping practices PDF” for comprehensive guides on tubing preparation, which heavily features flaring and reaming procedures.
  • SAE J514 Hydraulic Flare Fitting Standards: For the truly technical, searching “SAE J514 standard” will lead to the definitive specification documents for 45-degree flare fittings.


The ECQ VP115 Vacuum Pump

The ECQ VP115 Vacuum Pump mbsmpro

Mbsmpro.com, ECQ Vacuum Pump, VP115, 2 CFM, 1/4 hp, 50 L/min, 220V, Single Stage, 5 Pa, Ultimate Vacuum, 100% Copper Wire, R134a/R410a, HVAC/R Tool


The Unsung Hero of Your Tool Bag: The ECQ VP115 Vacuum Pump

If you work in refrigeration or air conditioning—whether you are fixing a small fridge in a local shop or installing a split system in a new apartment—you know that moisture is the enemy. It is the silent killer of compressors. You can have the best welding skills in the world, but if you leave air inside the pipes, that unit will fail.

This is where the ECQ VP115 comes in. It is not the biggest pump on the market, but for an artisan bricoleur or a technician on the move, it is often exactly what you need. It is compact, it is reliable with its 100% copper winding, and it pulls a vacuum deep enough to degas a system properly before you recharge with R134a or R410a.

Why 2 CFM Matters for Small to Medium Jobs

Many technicians think “bigger is better,” but that isn’t always true. A huge 8 CFM pump is heavy and can actually pull a vacuum too fast on small capillary systems, causing moisture to freeze before it boils off. This 2 CFM (50 L/min) pump is the “Goldilocks” size—perfect for:

  • Domestic Refrigerators (1/5 HP to 1/3 HP compressors).
  • Split Air Conditioners (9000 to 18000 BTU).
  • Car Air Conditioning systems.

It is light enough to carry up a ladder but strong enough to hit 5 Pa (approx 37 microns) of ultimate vacuum.


Technical Specifications: The “Heart” of the Pump

Here is the detailed breakdown of what this machine offers.

Feature Specification
Model VP115
Voltage / Frequency 220V~50Hz / 60Hz
Free Air Displacement 2 CFM (approx. 50 L/min)
Ultimate Vacuum 5 Pa (0.05 mBar)
Motor Power 1/4 HP
Motor Type 100% Copper Winding (High durability)
Oil Capacity 320 ml
Intake Fitting 1/4″ Flare (Standard SAE)
Dimensions 275 x 122 x 220 mm
Net Weight ~5.3 kg
Application R134a, R22, R410a, R407c

Comparison: VP115 (Single Stage) vs. Dual Stage Pumps

When you are deciding between a single-stage pump like this and a more expensive dual-stage unit, it helps to see the difference clearly.

Characteristic VP115 (Single Stage) Typical Dual Stage (e.g., 2VP-2) Verdict
Vacuum Depth 5 Pa (Good) 0.3 Pa (Excellent) Single stage is fine for standard repairs; Dual is for deep-freeze/scientific work.
Weight ~5 kg (Light) ~10 kg (Heavy) VP115 is much easier to carry to rooftops.
Price Affordable Expensive VP115 offers better ROI for general repairs.
Maintenance Simple Oil Change Complex Single stage is more forgiving with dirty oil.

Performance Analysis: Speed vs. Quality

Let’s compare how this pump performs against other common sizes when evacuating a standard 12,000 BTU Split AC.

Pump Size Time to 500 Microns Risk of Freezing Moisture Best Use Case
1 CFM (Small) 45+ Minutes Low Very small fridges only.
2 CFM (VP115) 20-25 Minutes Balanced Residential AC & Fridges.
6 CFM (Large) 5-8 Minutes High (if not careful) Commercial chillers / Large VRF.

Pro Tip: Always use a micron gauge. The sound of the pump changing pitch is a good sign, but it is not a measurement!


Maintenance & Troubleshooting

To keep your VP115 running for years, follow this simple maintenance schedule.

Symptom Probable Cause Solution
Poor Vacuum Dirty or low oil Drain oil while warm and refill with fresh vacuum oil.
Oil Mist at Exhaust Normal operation This is normal when pumping large amounts of air at the start.
Pump Overheating Low voltage or blocked fan Check your extension cord gauge and clean the fan cover.
Hard Start Cold weather Warm up the oil or open the inlet port briefly to relieve pressure.

The ECQ VP115 Vacuum Pump mbsmpro

Focus Keyphrase:

ECQ Vacuum Pump VP115 2CFM 1/4HP

SEO Title:

Mbsmpro.com, ECQ Vacuum Pump, VP115, 2 CFM, 1/4 hp, 50 L/min, 220V, Single Stage

Meta Description:

Discover the ECQ Vacuum Pump VP115 (2 CFM, 1/4 HP). Perfect for HVAC technicians and artisans. Full specs, maintenance tips, and comparisons for R134a/R410a systems.

Slug:

ecq-vacuum-pump-vp115-2cfm-quarter-hp-specs

Tags:

Mbsmgroup, Mbsm.pro, mbsmpro.com, mbsm, Vacuum Pump, VP115, HVAC Tools, 1/4 HP Pump, Refrigeration Repair, Air Conditioning Service, 2CFM Vacuum, Compressor Tools

Excerpt:

The ECQ Vacuum Pump VP115 is the ideal tool for the artisan bricoleur. With 2 CFM displacement and a durable 1/4 HP motor, it perfectly balances portability and power for residential AC and fridge repairs. This guide covers specifications, maintenance, and why 100% copper winding matters for your daily work.